I'm really enjoying my time at Baptist. Primary care is SOOOO much better than surgery. You've got a lot of patient contact, which I really like. Another thing I like is cool weather. So, my favorite seasons, if we actually HAD them, would be fall and spring. However, just like the entire eastern side of the US, MS has had hot temperatures. But, in honor of the fall season, I made a yummy and healthy soup.
This is from Ellie Krieger at the
Food Network. She provides healthy and nutricious recipes that are still yummy. In fact, just posting these pictures reminded me how good this was. I may do it again soon and add some sweet potatoes or butternut squash. That would be good as well. This soup has lots of veggies and even provides protein through the beans. Because of the veggies, there are tons of antioxidants in this soup. So, this is my entry to
Sweetnick's ARF Tuesday. Stop by her site for more GREAT recipes.
 Tuscan Vegetable Soup
 , adapted from Ellie Krieger, 2007
1 (15-ounce) can low-sodium kidney beans, drained and rinsed
1 tablespoon olive oil
1/2 large onion, diced (about 1 cup)
10 baby carrots, diced (about 1/2 cup)
2 stalks celery, diced, (about 1/2 cup)
1 small zucchini, diced (about 1 1/2 cups)
1 teaspoon prepared garlic
sprinkle dried thyme
sprinkle dried parsley
1/2 teaspoon salt
1/4 teaspoon freshly ground black pepper
32 ounces low-sodium chicken broth or vegetable broth
1 (14.5-ounce) can no salt added stewed tomatoes, cut (I'd used chopped next time)
2 cups baby spinach leaves
1/3 cup freshly grated Parmesan, optional
In a small bowl mash half of the beans with a masher or the back of a spoon, and set aside.
Heat the oil in a large soup pot over medium-high heat. Add the onion, carrots, celery, zucchini, garlic, thyme, sage, 1/2 teaspoon of salt and 1/4 teaspoon of pepper, and cook stirring occasionally until the vegetables are tender, about 5 minutes.

Add the broth and tomatoes with the juice and bring to a boil.

Add the mashed and whole beans and the spinach leaves

and cook until the spinach is wilted, about 3 minutes more.

Serve topped with Parmesan, if desired.
 Microwave Cauliflower
  For months I've been watching, enjoying the posts, and thinking that would be fun. So I finally joined. Another reason...they make things that I can make but never would without "having" to make it...so it's a challenge for myself! This month the challenge was given by
  Basically, it's a Boston Cream Pie made with an orange chiffon cake and a true custard rather than just a cream...and it's set up a bit differently...custard on bottom, then cake, then chocolate. I made this for a get together with some friends from school. I don't really have any good ramekins that can be put in the oven, so I decided to make a large version of this. In the end, it turned out okay but my original plan didn't work.
 I wanted to let the custard set in a round cake pan, flip the pan over on a plate, and have the custard beautifully slip out onto the plate. Well...the slipping out was just a dream! I ended up scraping the custard out and spreading back into the proper shape on the plate. Then I topped it with my chiffon cake, which I thought turned out great. Everyone at the party enjoyed the cake. If you want to see some other entries drop by the
  Bostini Cream Pie (from Donna Scala & Kurtis Baguley of Bistro Don Giovanni and Scala's Bistro)Makes 8 generous servings
 I'll be doing this again. Because of all the veggies, this is full of antioxidants so it is perfect for
  Couscous Stuffed Peppers
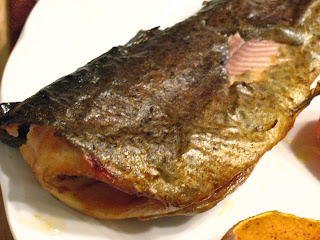 I have such a good Daddy...he brought the trout home and then grilled it on the cedar planks I got them for Christmas. Let me say, it was SOOOO good! I paired it with roasted sweet potatoes, tomato, corn, and squash.
  Speaking of sweet potatoes...if you ever get bored in the kitchen on a Saturday, especially with your mom!, just grab a sweet potato, hand the a strawberry to your mom and strike a pose
 . Then, wait for the perfect pitch, swing away, and hit that strawberry across the kitchen. This will result in a busted strawberry,
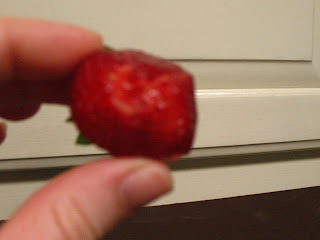 a stained potato,
 and lots of laughs! Yes, I promise, I'm still in medical school but we all have our weaknesses!
 So, I pulled out a bag of my frozen blueberries from this summer and set to work. In deed, this is a simple recipe and turned out very well. The batter that I had was VERY thin and that led to some of the topping settling to the middle of the muffin. Just a nice little surprise there! Because of the blueberries this is full of antioxidants; thus, this is my entry for
  Blueberry Crumb Top Muffins
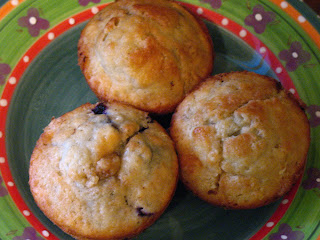 Heat oven to 400 degrees.Grease bottoms only of 12 medium muffin cups or paper lined cups. Beat the milk, oil, vanilla extract and egg. Stir in the flour, sugar, baking powder & salt all at once until flour is moist THE BATTER SHOULD BE LUMPY-DO NOT OVERMIX. Add the blueberries, combine and divide batter evenly among muffin cups. Sprinkle each using about 2 tsp of the prepared topping. Bake 20-25 minutes or until golden brown. Remove from pan to cool.
 She has some great looking biscuit recipes. Now, biscuit making was always a skill that any good housewife had. The family would get up to prepare for a hard day of work and biscuits were a staple of the breakfast. Lots of people rave about their grandmother's biscuits. I don't remember biscuits specifically. In fact, our biscuits are usually the frozen kind. Now, don't pity my because these biscuits are puffy and yummy. In fact, it always amazed me that the biscuits from Pillsbury that are frozen always come out so fluffy, while homemade, which is supposedly the best ALWAYS, come out flatter. How is it that the frozen ones are so much better? So, I want to figure out this mystery. Maybe I'll do some homemade and freeze them. Maybe it's the freezing and baking from frozen state that makes them get tall.
  Anyway, I decided to try a version of Dorie's Basic Biscuits. I did make a few changes but followed her suggestion of using 1 3/4 cups AP flour and 1/3 cup cake flour. The biscuits were still a little flatter than a frozen biscuit but were very good. I've seen my roommate with one, so I know she likes them. Through the weeks I'm going to keep experimenting, but I would recommend these. If you want a little extra flair, throw in some blueberries or pecans before you start.
  Basic Biscuits adapted from Baking from my home to yours
  Preheat oven to 425 degrees F. Whisk together flour, baking powder, sugar, and salt. Drop the butter in and, using your washed hands, blend the butter and flour together quickly. You can also use a pastry blending if you desire. Do this until you have a pebbly, sandy mixture.
  Dorie suggests that these can be frozen after cutting by freezing them on a baking sheet, then wrapping them air tightly and placing in the freezer. They will just require a little longer to bake.
 now it looks like this
 I have a 8-10 inch pony tail sitting on my dresser, ready to mail to Pantene to be used in a wig. I hope someone enjoys it! What else is new?
  I haven't had couscous is forever and wanted to try something with it. Using chicken broth to make the couscous gave this an almost dressing-like flavor! SO GOOD! I'm probably going to try this again but put in more veggies to bulk it up some. I highly recommend this AND the other dishes that you will find at
  Baked Couscous with Summer Squash and Herbs from Cooking Light July 2005
 Preheat oven to 400°. Bring 1 cup chicken broth to a boil in a medium saucepan; gradually stir in uncooked couscous. Remove from heat; cover and let stand 5 minutes. Fluff couscous with a fork.
 You can use this as a side dish or large portions for a main dish served with a salad and fresh fruit.