There's an interview meme going around. I've already done one of these at my other blog but thought that a food blog interview would be fun. After seeing
Peabody's answers, I thought it would be a great time to ask someone to interview me. Now that my Step 1 exam is over and I have two lovely weeks of summer, I have time to answer the questions. So, if you want to know a few things about me, read on!
1. You seem very close with your family. Have you always been close or is
this something that has come about as you were an adult?
Well, this is something to think about. I think we've always been close. I enjoy being around them and they always encourage me in what I do and pray for me daily. I think that being in medical school, in an apartment has made me realize what a blessing they are to me. My parents are such awesome examples to me of what a husband and wife should be and what parents should be. This year they moved from our hometown of 23 years in Clinton, MS to Jackson, TN. That was really hard for me but I think I appreciate home even more now! Mama and I talk almost every day and definitely e-mail if we don't talk. Daddy doesn't really talk on the phone but "keeps up" with me through this blog (ROSES!!!!!!). So, we've always been close, but I think have gotten closer over the past couple of years.
2. How on earth do you find time to study for medical school and run a food
blog?
That is a good question! Sometimes, my study breaks are used to write posts. This second semester I seemed to get busier and posting was more infrequent. I'm afraid that next year will be even worse, as I will be at the hospital most days all day. We have to go around and see all our patients before rounds, which are sometimes at 8. Hopefully, I'll still be here cooking and posting! I really enjoy it and cooking is a pleasure for me...if only I had more people to cook for!
3. You seem to cook a lot of healthy dishes on your blog. What food if it
had no calories would you eat all the time?
Hmmmmm...this really is a hard one! There are foods that I don't make for myself but will eat other places, but those truly are not foods I would want to eat all the time. I guess I would have to say dessert! I don't eat dessert that often but do enjoy it. As you can see from my blog, I also like making it! However, usually when I make it, it's either for someone else or I eat one piece and then no more. My other thoughts were peanut butter, cheesy stuff, and fried foods...oh, maybe fried foods!
4. You are a Southern gal. What is your favorite "Southern" dish?
I LOVE cornbread...I guess if I went with a "Southern" meal, I would say either fried catfish (which I now usually get grilled), turnip greens (recently discovered as yummy) but not cooked with ham hocks, I just don't like that!, and cornbread or a yummy vegetable dinner! Those are great!
5. What kind of doctor do you want to be(meaning, what will your specialty
be) and did you always want to be a doctor?
OH! I want to be a pediatrician. Last summer I worked in the ambulatory clinic at my hospital and absolutely loved it. I mean, I get to play with babies, take care of little sick kiddos and make them better, and encourage parents. Given, there are some times when the parents can be hard to deal with and when 6 year-olds don't want to have their throat swabbed for strep test (if you close their nose, they'll open their mouth!), but in the end it's rewarding and most kids get better. I've been told by MANY people that they can see me doing that and I have the personality for it, so I can't WAIT for my pediatric rotation, which, unfortunately, is my last rotation NEXT April!
Did I always want to be a doctor? WELLLLLL, when I was little I said I was going to be a nurse but found out they practiced giving shots on each other and quickly gave up that idea. This year I practiced drawing blood on a classmate and she did the same to me! Can't get away from it! In sixth grade, I thought I'd be a physical therapist. After about eighth grade, I don't think I really knew what I wanted to be, just that I liked science and math. I went to college and majored in chemistry and minored in math...all while having medical school in the back of my mind. My concerns were over the time that it takes to complete training and the time required during that training. You see, I wanted (and still desire) to have a family - to be a wife and a mama - and didn't see how medical school and being a physician would work with that.
So, my junior year, I took medical physiology and loved it. It was hard but I enjoyed learning how the body worked. I came to the conclusion that God was calling me to go to medical school and serve Him through being a doctor. I just decided one day, that's what I'm going to do...I have to. After that, I had such a peace that I was doing the right thing and have not doubted it since. I am SO excited about what is to come in my life and how I'm going to be able to work with people, encouraging them and hopefully helping them get better.
So, now you know some more about me...what about you? Do you want to be interviewed? Here are the directions:
1. Leave a comment saying, “Interview me.”
2. I will respond by emailing you five questions. Beware, I may ask personal questions! Please make sure I have your email address.
3. You will update your blog with the answers to the questions.
4. You will include this explanation and offer to interview someone else in the same post.
5. When others comment asking to be interviewed, you will ask them five questions.
 The recipe I use is from Southern Sideboards and is what I have grown up on. It always comes out moist and delicious, unlike the typical college cafeteria pork loin (so have no fear if that is what you think of when you hear pork loin!). This recipe does take some time in the oven but is quick to prepare with hands-on time. It's great for a Sunday lunch, as you can leave it in the oven while you go to church, etc.
 In addition to thyme, this recipe uses dry mustard, ground ginger, and garlic. With all of these spices and herbs this is a perfect entry for this weeks Weekend Herb Blogging being hosted by Kalyn. Stop by on Sunday and see all the other entries. Now to the recipe....
 Roast COVERED (This is a change from the original recipe - this keeps it tender and moist) at 325 degrees F for 3 hours or until meat thermometer registers 175 F. (I cooked for 3 hours and it was perfect). Baste occasionally with marinade during last hour of roasting time (Well, I didn't do this). You can use the juice in the pan for gravy if you want.
  My family usually serves this with potatoes au gratin, veggies, and fruit. This night, we had sweet potatoes, green beans, and rolls.
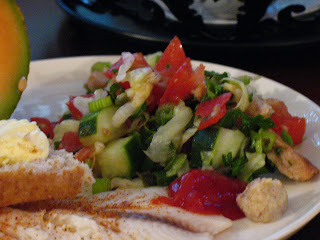 Because of all the veggies, including tomatoes, which are full of antioxidants, this is my entry to
  Fattoush
 These cookies are from a recipe my mom's best friend gave us. She is famous around my hometown for these and often, people ask if there are any "Joanie cookies." The official name is the Sharpe cookies, owing to the fact that they look like Sharpe bulldogs.
  Before I give the recipe, there are a few things you must know...BUTTER IS A MUST!!! I've tried margarine and is does not work! Number two, if you have White Lily flour available, use it! If not, use a light baking flour. Number three, either use air bake pans or baking stones. These are all commands (i.e., suggestions) from Joanie! We've done experiments and found that butter is a MUST, White Lily flour DOES make a difference, and the air bake pans aren't a must as stones work as well...I don't know about "normal" baking sheets.
  I've done several variations on these including white chocolate chips, Reese's peanut butter cups (OH, so good), cappucino chips, and special edition raspberry dark chocolate swirl chips. They all work, but I think the best is the original chocolate chip. So, without further ado, ENJOY!
  Add egg and vanilla and mix. Mix together flour, salt, and soda. Add slowly to butter mixture and stir until just combined. Add chocolate chips.
 Place dough on baking sheet/stone in large tablespoons (I use a FULL tablespoon sized cookie scoop but my brother thinks they should be bigger - Joanie does them bigger). Bake for 11-13 minutes. If you do them larger, they may require more time. NOW, here is the special technique. IMMEDIATELY after taking the pan out of the oven, using the backs to two soup spoons,
 squunch (I don't know if that's a word, but I think it should be) the cookies together all the way around. This must be done quickly so that they don't harden too much.
  Allow to cook for a few minutes and remove to cooling rack to finish cooling. Makes about 36 cookies, depending on how big you make them.
  Anyway, I made pork loin and it was a great success. The recipe will be coming up. This post is dedicated to the dessert.
  I used sugar free ingredients with the exception of the crust, as it was premade. However, this could easily be made into a diabetic friendly dessert. The flavor was perfect...not heavily coffee but light and sweet. Quick and easy - this is one of those pantry desserts when you're in a bind.
  Cappucino Pudding Pie
  Pour the pudding mixes into a bowl. Pour milk into the bowl and stir until combined. This will be VERY thick. Add coffee granules and around 1 cup of the cool whip. Spread in the pie crust. Spread remaining cool whip over the pudding mix. Refrigerate until ready to serve.
 Garden Frittata

 There were frozen bananas awaiting me this weekend. I waited until the last day I was there to make the bread because I wanted to find a new recipe. I tried to find one for peanut butter banana bread and then changed my mind. I found a recipe from Bell's Best II and was going to use it. Then I returned to my original thought and decided I would modify the recipe to make it peanut butter banana bread. Well, I guess I ended up changing it a pretty good big because of a brain mistake. When I measured the peanut butter, in a 1/4 cup measure, I over-filled it and thought "that's probably around 1/3 of a cup. SO, from then on out, still using the 1/4 cup measure, I thought I was using a 1/3 cup measure. When you use it multiple times for one ingredient, that changes the total measures a bit! No worries, the mistake was perfect!
  I also decided to try baking this on convection, which I don't really like all that much. Overall, I don't think it changed much...I still baked it for 50 minutes (after checking the bread at 35 minutes and finding it under-done). However, it was perfectly baked. I asked Mama if SHE could tell it had peanut butter in it and she couldn't. I vaguely tasted it, but I think that is becuase I KNEW it was there. If nothing else, it gave a great texture.
  Because both peanut butter and bananas are healthly for you, this is my entry to
  Peanut Butter Banana Bread
  That was my brother's reaction when Daddy tried to take a bite of his ice-cream, chocolate chip cookie sandwich. In the midst of studying for my Step 1 exam, I came home for Mother's day. I really do enjoy coming home. There's just something comfortable about being with family, and I do LOVE mine! It'll be fun when I have my own.
 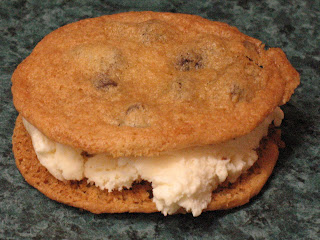 So, I went in search of a recipe to use. The normal recipe I use for chocolate chip cookies is definitely not for sandwiches. The one I finally decided on was from The Joy of Cooking. It is not one I would use for just a normal cookie as it i too flat for my taste. HOWEVER, it is the perfect ice cream sandwich cookie - flat but not so crispy that it breaks. When Philip saw them he said, "Oooh, they look like the M&M kind. I suppose that's good! So, put a grin on someone's face and make a cookie...you might even make them scream!
 Chocolate Chip Drop Cookies from The Joy of Cooking
 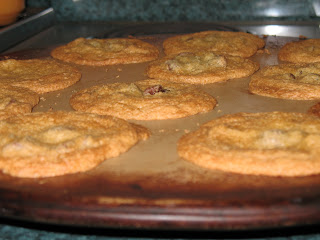 If making ice cream sandwiches, take a flat, rount cookie bottom-side up and add a scoop of your favorite ice cream. Top with another cookie and enjoy.
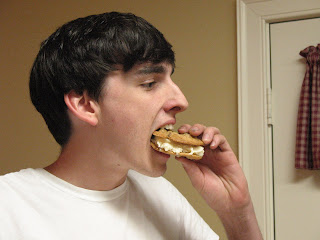
 Well, we made a deal...I make panzanella and she would make the cornbread panzanella. Tada...I've done it! SO GOOD! As I was making this, the aromas just flirted with my tastebuds! It took me back to Kyrgyzstan with the wonderful fresh tomato and cucumber salads with vinegar poured over them. I immediately looked forward to eating this salad.
  What a super way to use up some stale bread. I'm already ready to eat lunch tomorrow! Because this is FULL of antioxidants from the tomatoes, this is my entry to Cate's ARF Tuesday over at
 Whenever Mama is asked to take a dessert somewhere, this is what she takes. It's always well recieved and is pretty easy. This is the only chocolate cake (fully chocolate) that I'll eat. I'm just not a big chocolate dessert fan. But my favorite part of this cake is the bottom part that sticks to the plate! Cut someone else a piece and I'LL eat the "goody!"
 In honor of Mama, this is my entry for
 Bake for one hour or until knife comes out clean when inserted into the middle. Allow to cool.
 Remove from pan. Serve with ice cream and chocolate syrup (optional).
 I am a pie crust snob and like making my own...you just can't trust the store bought kind. So, I'll give you the crust recipe as well as the pie recipe. Feel free to "lighten" the recipe by using sugar free ingredient...I did and actually think it worked better than the full sugar variety. Because berries are FULL of antioxidants, this is my entry to